In the previous post, I wrote an extensive guide on deploying Cloudflare as the upstream DNS for Pi-Hole over HTTPS. This is a follow-up where Cloudflare is replaced with Unbound as the upstream DNS server.
Unbound is a recursive DNS that sits between Pi-Hole and authoritative DNS servers. Cloudflare's 1.1.1.1 and Google's 8.8.8.8 are examples of recursive DNS services. By making Unbound the upstream DNS server for Pi-Hole, you're cutting out other third parties from tracking your web presence. A more detailed read-up of this setup can be found on the official Pi-Hole Unbound guide.
Back on June 11, 2021, Cloudflare DNS experienced outages in the Los Angeles and Chicago area. The result was over an hour of downtime with its DNS service. I was able to avoid that outage by switching over to Unbound and letting it handle domain resolution directly with authoritative DNS servers. This method can be a little slow but DNS caching in Pi-Hole becomes beneficial on subsequent lookups.
Deploying Unbound with Pi-Hole
In the previous post, Pi-Hole and Cloudflare DNS were deployed using Docker Swarm and managed through Portainer with Traefik as the reverse proxy. This will follow the previous guide closely. Let's start by cloning the project:
git clone https://github.com/foureight84/traefik-pihole-doh.git && cd traefik-pihole-dohThis guide assumes that your Docker Swarm, Portainer, and Traefik have been properly configured. If not, follow this guide.
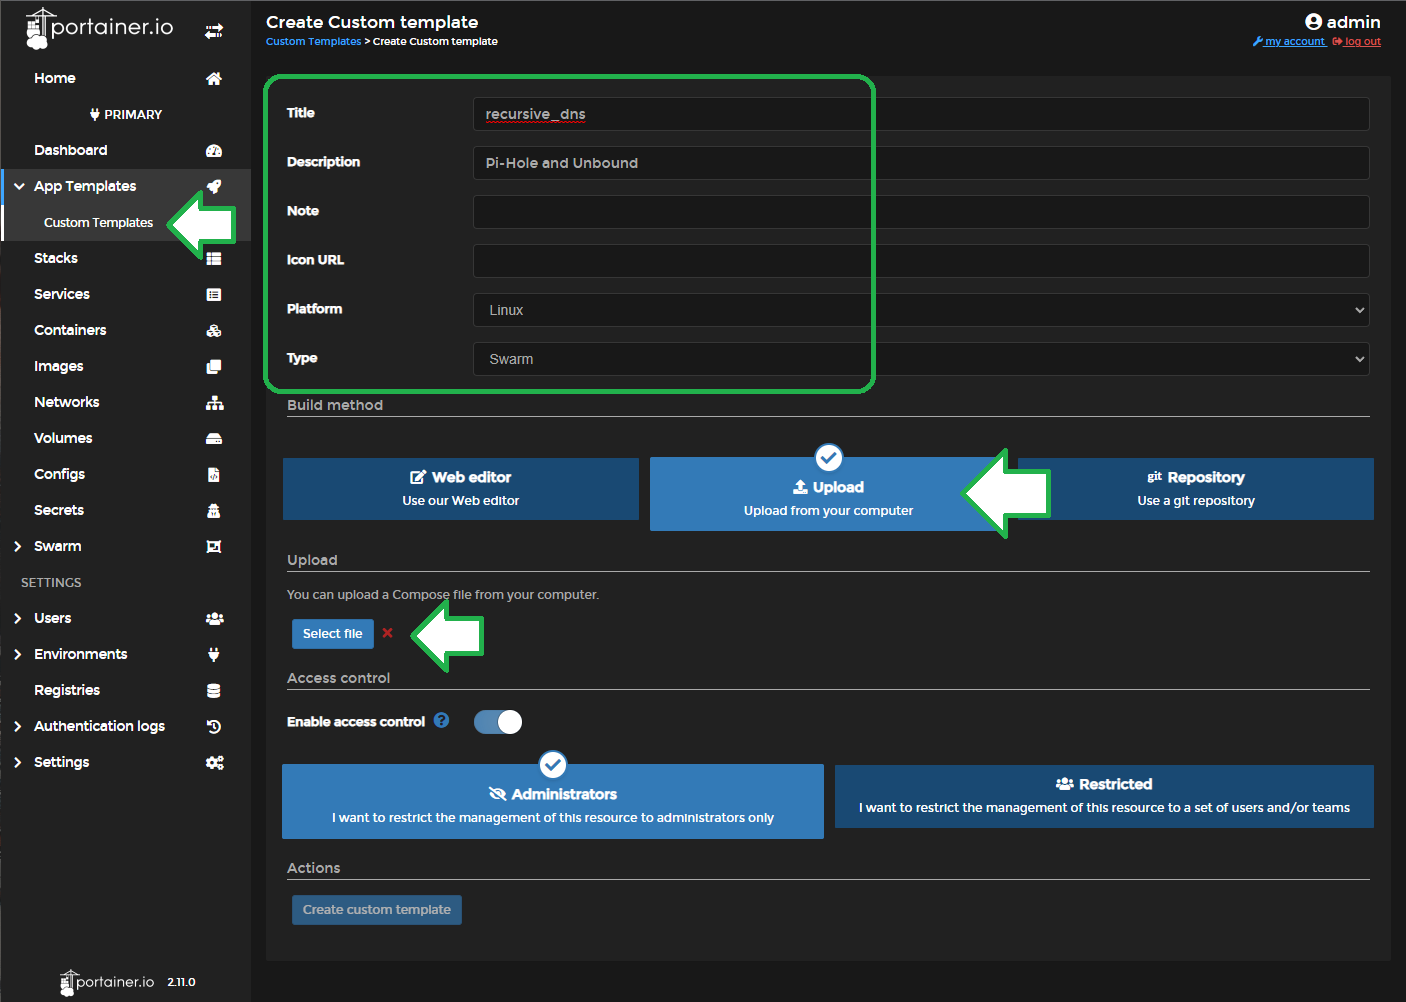
Go to your Portainer web portal and click on App Templates -> Custom Templates and click on the "+ Add Custom Template" button.
This stack uses Unbound Docker image created by Kyle Harding (https://github.com/klutchell)
Image: https://hub.docker.com/r/klutchell/unbound
Github: https://github.com/klutchell/unbound-docker
You'll need to fill in a relevant title for the template. I called mine recursive_dns. Add a description - Pi-hole and Unbound. Make sure the template Type is set to Swarm. Then click on the Upload option and choose the docker-compose.yaml in the dns-unbound folder in the cloned project.

After it has been uploaded, find the newly created custom template in the list of templates and click edit.
We will need to check that PIHOLE_DNS_=172.18.0.1#5053 environment variable matches your docker_gwbridge IPV4 IPAM Gateway address. Once verified, deploy the stack. That's it!
Deploy the stack once the custom template has been uploaded. The klutchell/unbound Docker image now listens on port 53 by default. Setting the PIHOLE_DNS environment variable to the unbound service name is all that's needed.
While uncached DNS queries may be slower than using Google's public DNS (8.8.8.8) we can see that Pi-Hole's caching outpaces all other public DNS services by far. Plus the millisecond differences in uncached queries are not noticeable in a real use case scenario. It's actually faster than using Cloudflare!

  192.168.  1.  4 |  Min  |  Avg  |  Max  |Std.Dev|Reliab%|
  ----------------+-------+-------+-------+-------+-------+
  + Cached Name   | 0.000 | 0.001 | 0.001 | 0.000 | 100.0 |
  + Uncached Name | 0.015 | 0.060 | 0.187 | 0.052 | 100.0 |
  + DotCom Lookup | 0.015 | 0.049 | 0.081 | 0.022 | 100.0 |
  ---<O-OO---->---+-------+-------+-------+-------+-------+
                     pihole.home
                Local Network Nameserver


    1.  1.  1.  1 |  Min  |  Avg  |  Max  |Std.Dev|Reliab%|
  ----------------+-------+-------+-------+-------+-------+
  - Cached Name   | 0.012 | 0.013 | 0.018 | 0.001 | 100.0 |
  - Uncached Name | 0.014 | 0.069 | 0.355 | 0.077 | 100.0 |
  - DotCom Lookup | 0.014 | 0.022 | 0.048 | 0.009 | 100.0 |
  ---<-------->---+-------+-------+-------+-------+-------+
                     one.one.one.one
                    CLOUDFLARENET, US

    8.  8.  8.  8 |  Min  |  Avg  |  Max  |Std.Dev|Reliab%|
  ----------------+-------+-------+-------+-------+-------+
  - Cached Name   | 0.012 | 0.015 | 0.023 | 0.002 | 100.0 |
  - Uncached Name | 0.014 | 0.038 | 0.158 | 0.040 | 100.0 |
  - DotCom Lookup | 0.014 | 0.016 | 0.025 | 0.002 | 100.0 |
  ---<-------->---+-------+-------+-------+-------+-------+
                       dns.google
                       GOOGLE, US