I've been using Pi-hole as a whole network ad blocker for a while now and it's been great. The only mistake I made the first time was using it as a standalone docker instance. Whenever I perform a manual update to a newer release, there would be a few minutes of internet downtime. Personally, it's not a big deal and I could just force a DHCP-renew. But I share my internet connection with my parents living next door and an internet outage immediately leads to a phone call.
There are various ways to update a running Docker container and minimize downtime, and I've chosen to update my stack to use Docker Swarm to accomplish this goal. Yes, the setup is overkill for a home network, but making things causal is always better down the road when you need to make changes.
I am currently using a J5005 Dell Wyse 5070 thin client as my server, but this article should apply to a Raspberry Pi. You should take a look at the Docker images used and swap them for ARM-compatible.
Disclaimer: This is meant for home use only. DO NOT deploy this in a Production environment. Pi-hole uses SQLite and concurrent write is not supported. While DNS resolution and blocking won't have issues, there will be loss of log data if two or more swarm nodes are writing to DB at the same time. Also, make sure your router is properly configured to not expose your DNS to the public internet. It will crash and burn.
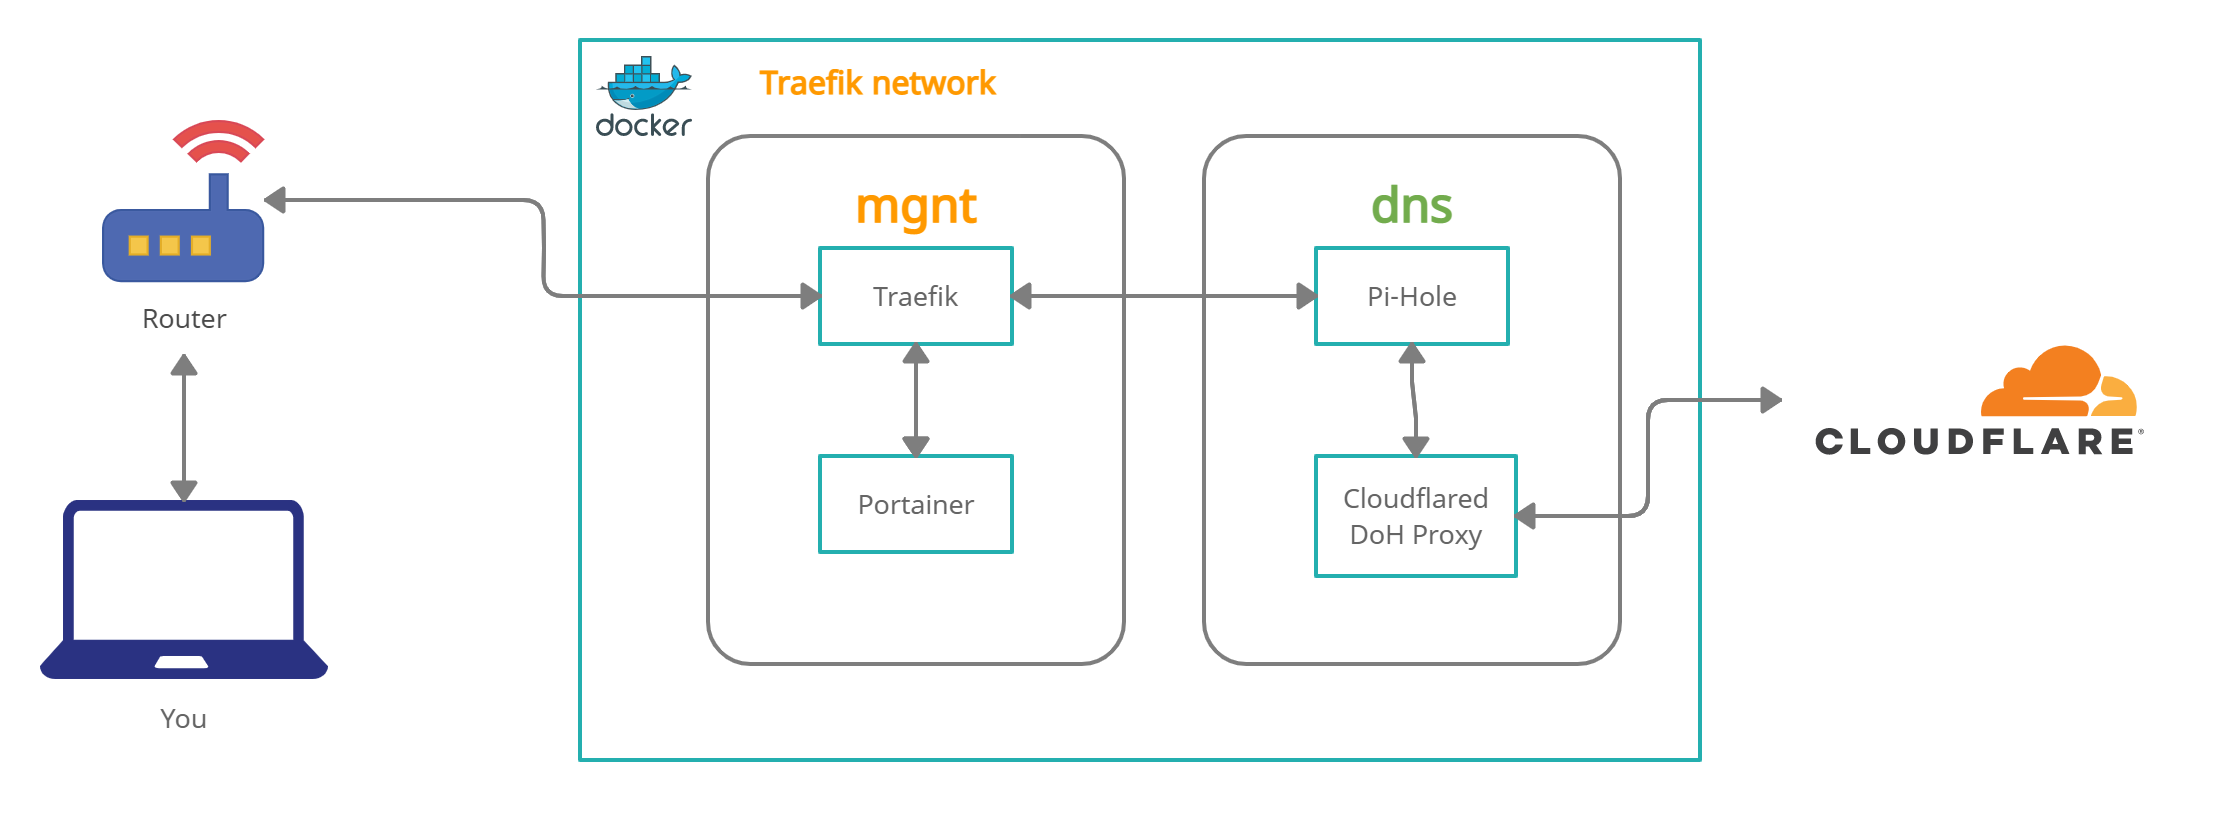
Stack Overview
- Management Stack (mgmt)
- Traefik - reverse proxy and load balancer
- Portainer - Web UI Docker management tool
- Whoami - Tiny Go webserver that prints os information and HTTP request to output
- DNS Stack (dns)
- Cloudflared DoH Proxy
- Pi-hole DNS adblocker and DHCP server
A few Details
Traefik is a GoLang reverse proxy and load-balancer with built-in support for Let's Encrypt. In my earlier post about using Terraform to deploy this Ghost blog, I used jwilder/nginx-proxy along with jrcs/letsencrypt-nginx-proxy-companion to serve as a reverse-proxy and automatic SSL certificate handling. However, that setup is on a Docker standalone deployment using Docker Compose. While it is possible to use an Nginx reverse-proxy with Docker Swarm, Traefik is a much better fit with Docker Swarm with fewer configurations involved.
Portainer is a container management tool with a web UI. It's used in this project to manage the DNS swarm, which makes scaling and service updates more casual. I personally prefer this to keep the project simple and doesn't require looking up Docker CLI commands.
Pi-hole, the main reason for this project, is a Linux based DNS server with built-in DHCP support. The main use for Pi-hole is to block advertisement domains, but it also has additional benefits in blocking known malware and phishing domains as well. As it is a DNS server, it can be used to apply to an entire network.
Getting Started
We'll first need to clone the project
git clone https://github.com/foureight84/traefik-pihole-doh.git && cd traefik-pihole-dohYou'll need to enable Docker swarm on your host if not already.
docker swarm initWe will need to create a Docker overlay network called traefik. Additional Docker services you choose to add later that require the use of Traefik will need to be attached to this network.
docker network create --driver=overlay --attachable traefikNow we spawn the mgmt stack and use Portainer to deploy and maintain swarms from here on out.
docker stack deploy -c mgmt/docker-compose.yaml mgmtIf your server is running Ubuntu >= 18.04, chances are, systemd-resolved is probably occupying port 53. We'll need to turn that off.
Update your hosts file with the hostnames for the running web services. Windows: C:\Windows\System32\drivers\etc\hosts, Linux/Mac: /etc/hosts/. For my setup, my home network has the domain of .home. You will need to change this for your setup. 192.x.x.x denotes the server this docker stack is currently running on.
192.x.x.x	portainer.home
192.x.x.x	traefik.home
192.x.x.x	whoami.home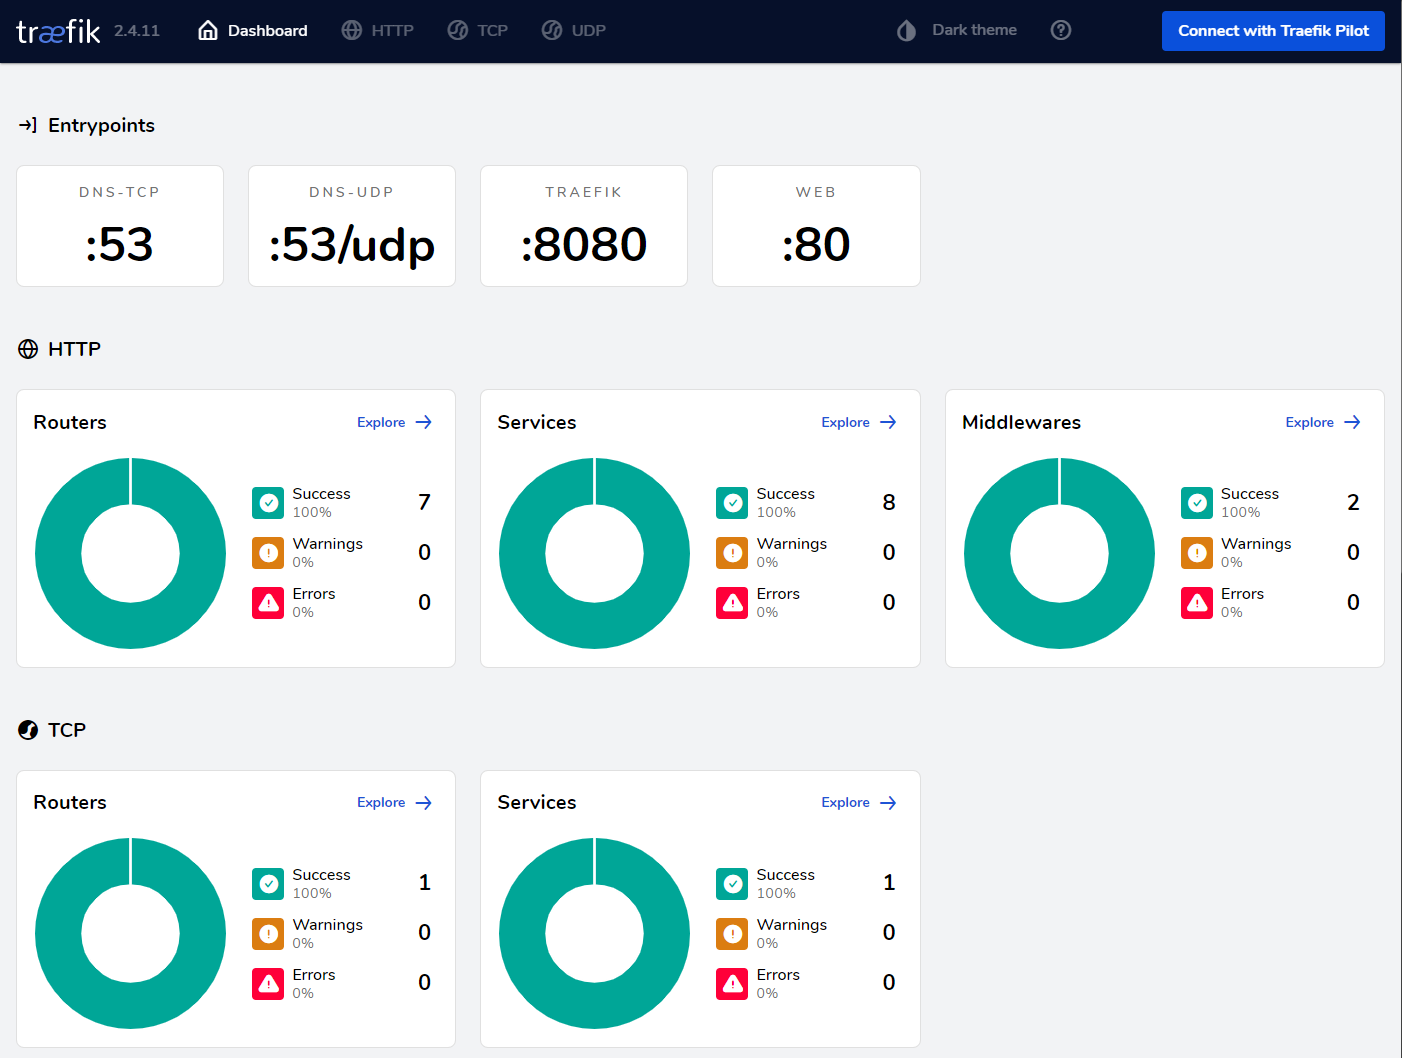
192.x.x.x pihole.homeTraekfik dashboard is available via http://traefik.home/local/dashboard/ don't forget the / at the end. You should see entry points for port 80 as well as 53 tcp and udp.
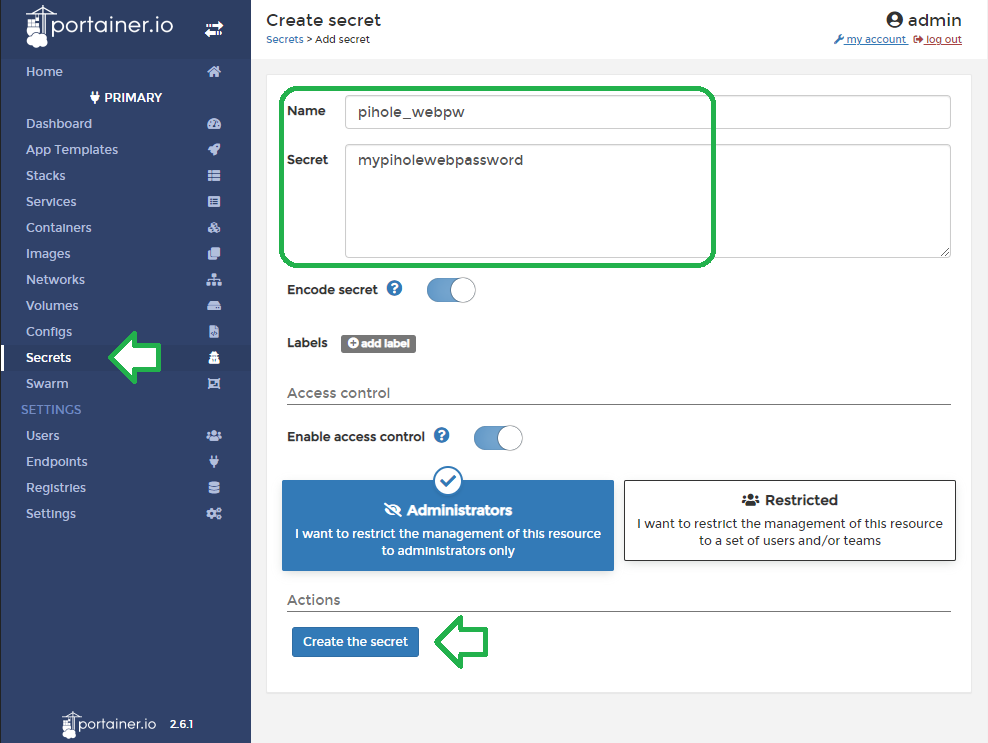
Go to Portainer via http://portainer.home and create your admin account. Once logged in, we will need to create a Docker Secret that will hold the web password for Pi-Hole web ui. The secret needs to be named pihole_webpw.
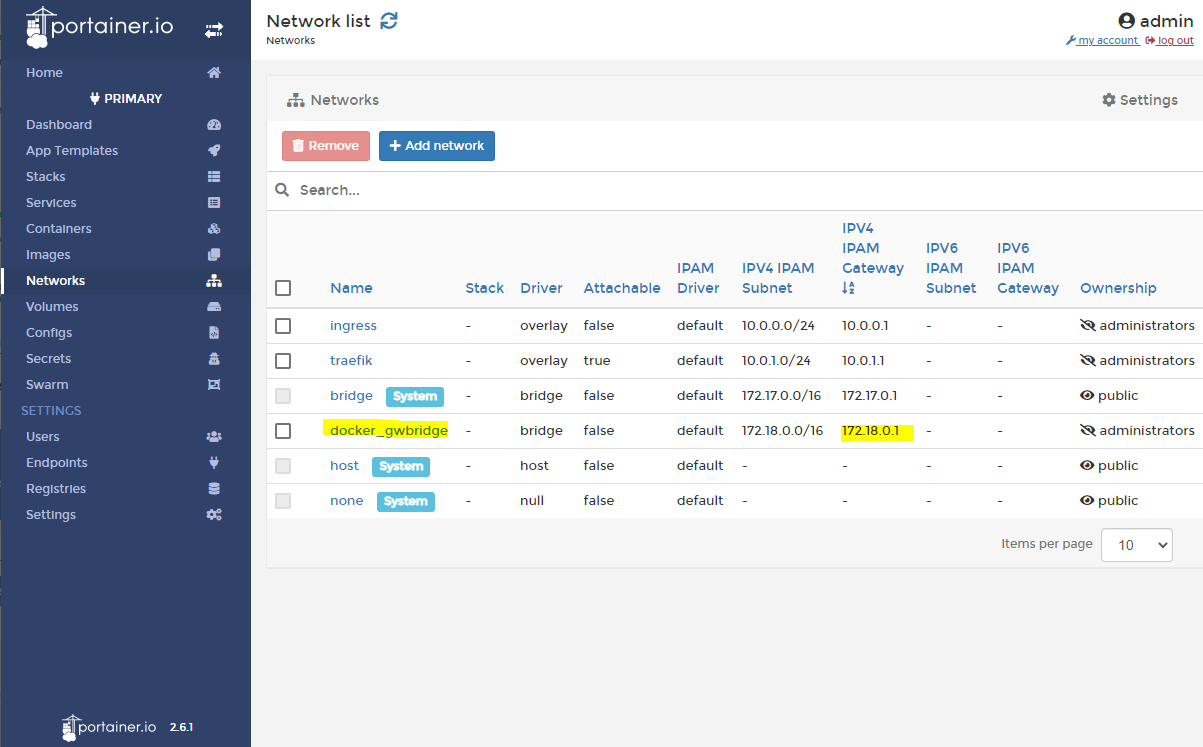
Make note of the docker_gwbridge network's gateway IPV4. This is used to forward DNS requests to the upstream Cloudflared DoH docker container. We can't use the IP the container gets assigned on the traefik network since that is not static.
Open the docker-compose.yaml in the dns folder with a text editor and update the DNS1 field with your docker_gwbridge's IP address.
environment:
      - TZ=America/Los_Angeles
      - DNS1=172.18.0.1#5054 #replace with docker_gwbridge's gateway ip
      - DNS2=no
      - REV_SERVER=true
      - REV_SERVER_CIDR=192.168.1.0/24 #Update these fields to match your environment
      - REV_SERVER_TARGET=192.168.1.1
      - REV_SERVER_DOMAIN=home
- WEBPASSWORD_FILE=/run/secrets/pihole_webpwThe REV_* environment variables should also be updated to match your setup as well. REV_SERVER and related fields allow Pi-Hole to perform a reverse DNS lookup against the router. I'm currently using my router's DHCP server (REV_SERVER_TARGET). Static ip and hostnames are kept on the router. Requests for my local NAS for example, will go through Pi-Hole and that will get forwarded to my router.
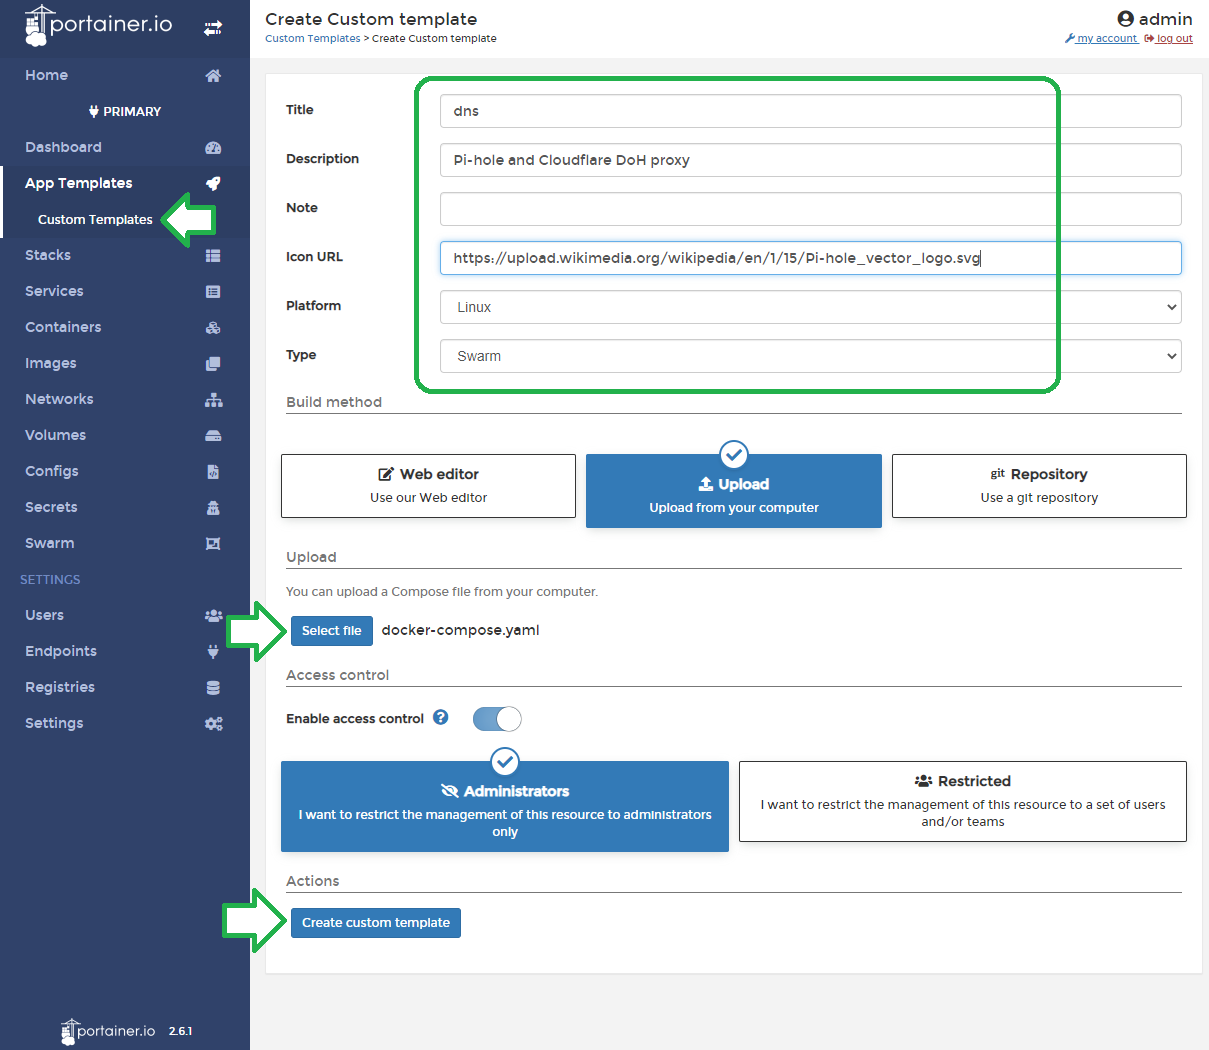
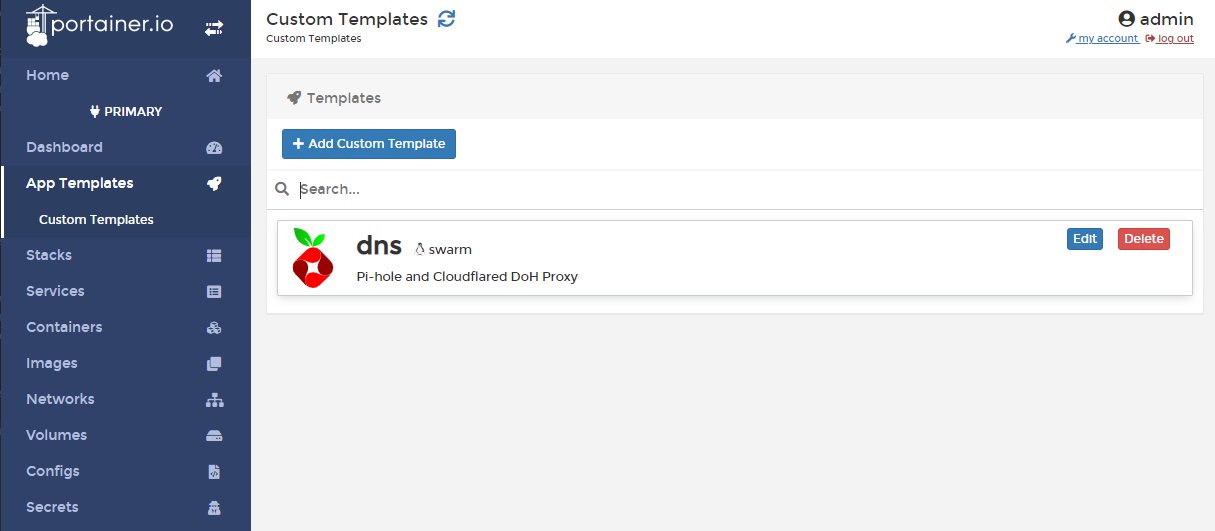
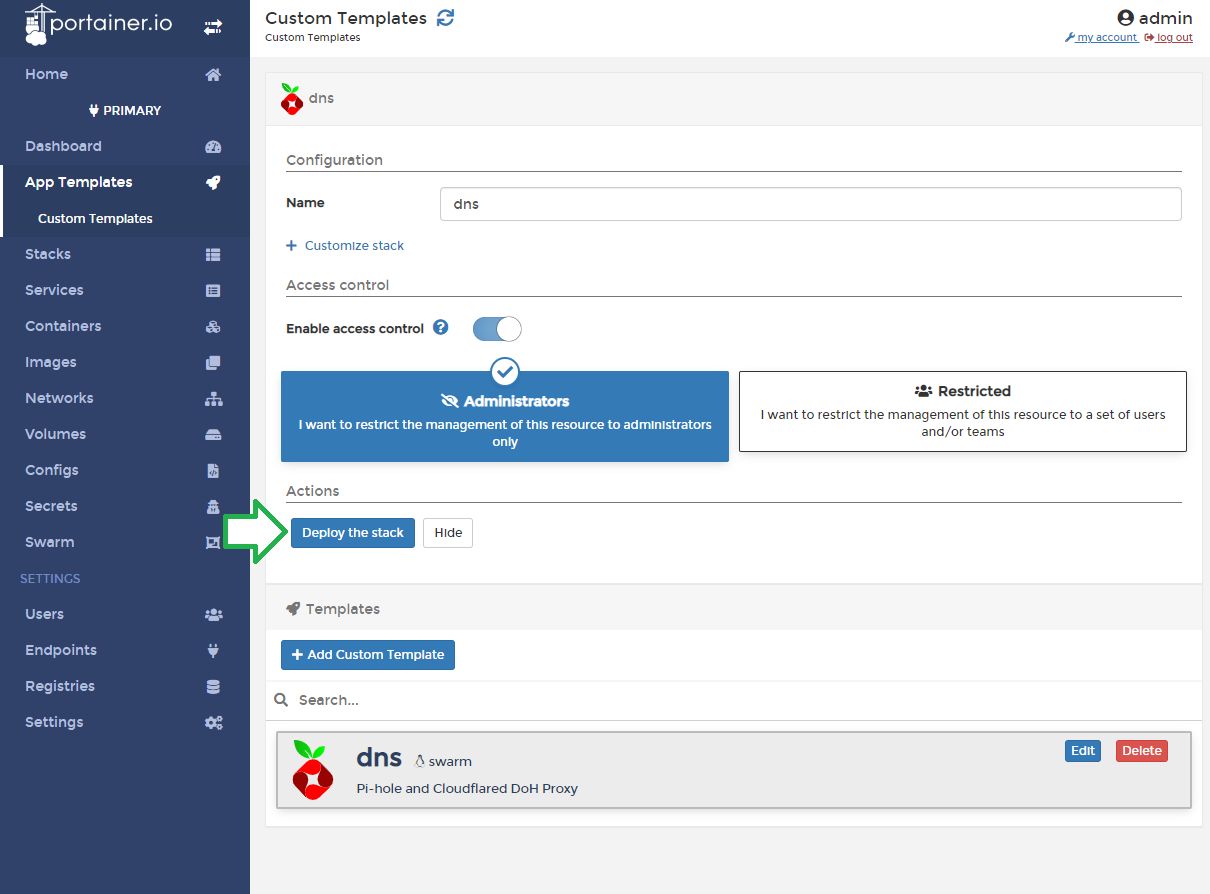
After making changes to the dns/docker-compose.yaml file, we will need to upload this to Portainer as a docker-swarm template and deploy the swarm.
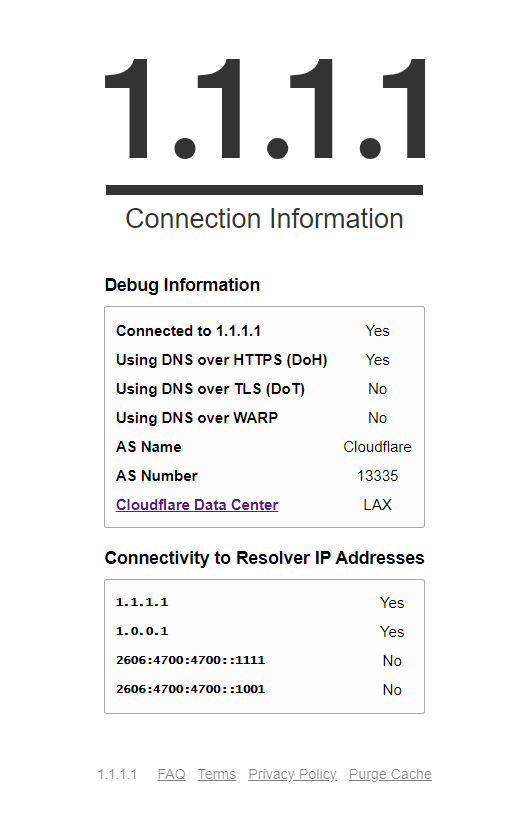
It should take a few minutes for Pi-Hole deployment to complete. Update the DNS on your computer with your server's IP and test before applying it as the DNS to use on your router. To check if DoH is working properly, head to https://1.1.1.1/help
Update Services
Since we are running in Docker Swarm mode, we can take advantage of rolling updates to minimize downtime. Of course, you need more than one instance of a service running in order to perform a rolling update.
We first need to change the --update-delay flag on the following services (or any that you want to apply a rolling update):
- Traefik
- Pi-hole
- Cloudflared
We will use 120s (2 minutes) as the delay from one service instance to the next. Pi-Hole and Cloudflare services can take up to 30 seconds to reach ready-state and process new requests. 120 seconds should give us ample time for a new Docker image to download and update the first instance while the other instances remain unchanged and continue to process new requests.
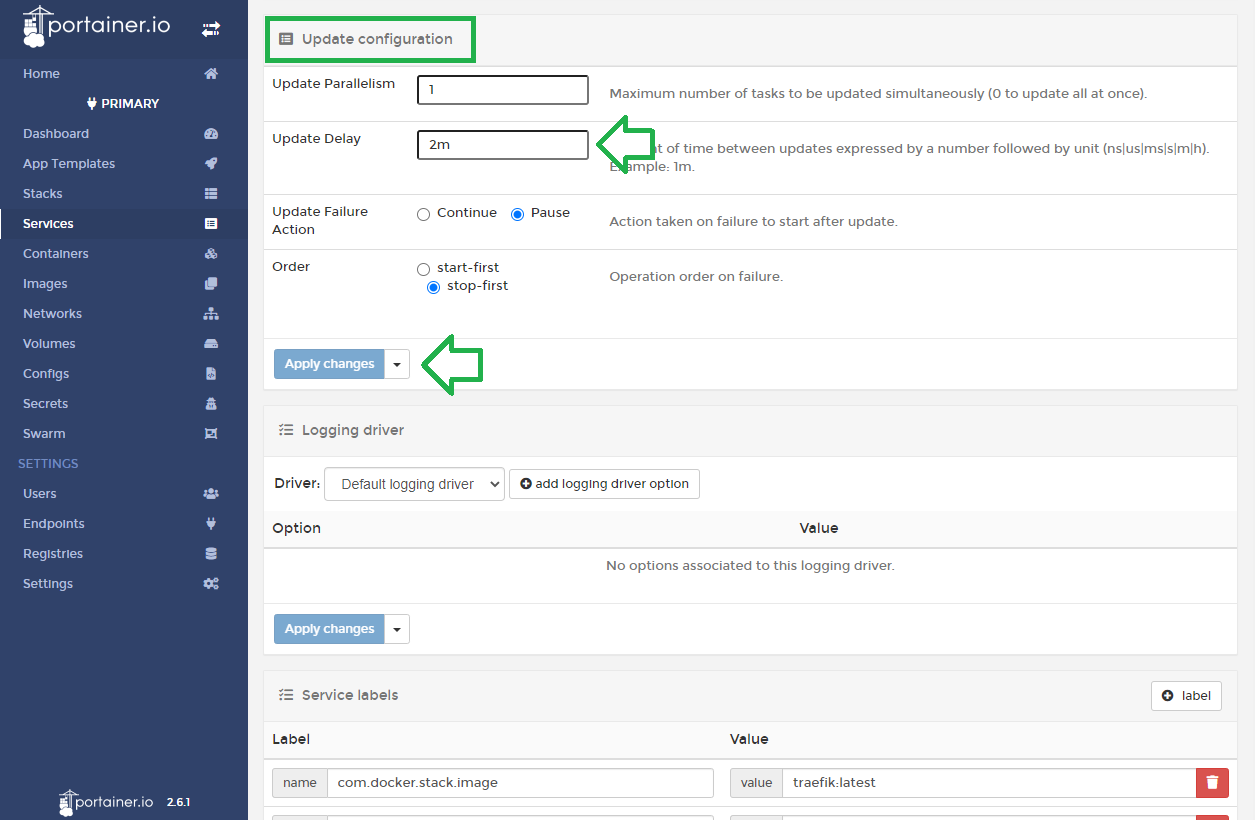
In the Service details view, click on Update configuration on the right-hand menu to scroll to the section shown in the image above. Update Delay should be entered as 2m or 120s.
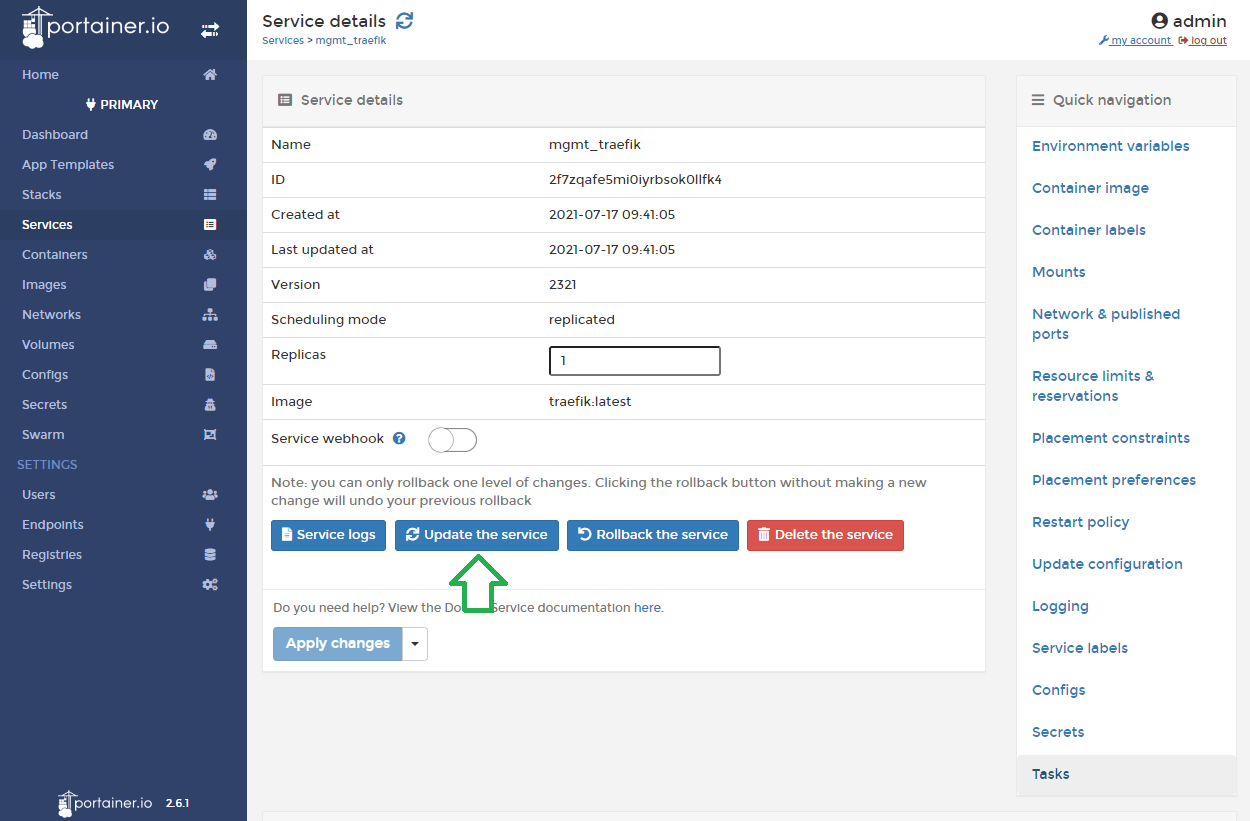
To update a service, scroll to the top and click on Update the service and toggle Pull latest image version on the confirmation screen. Now Docker will update each running instance one-by-one 120 seconds apart.
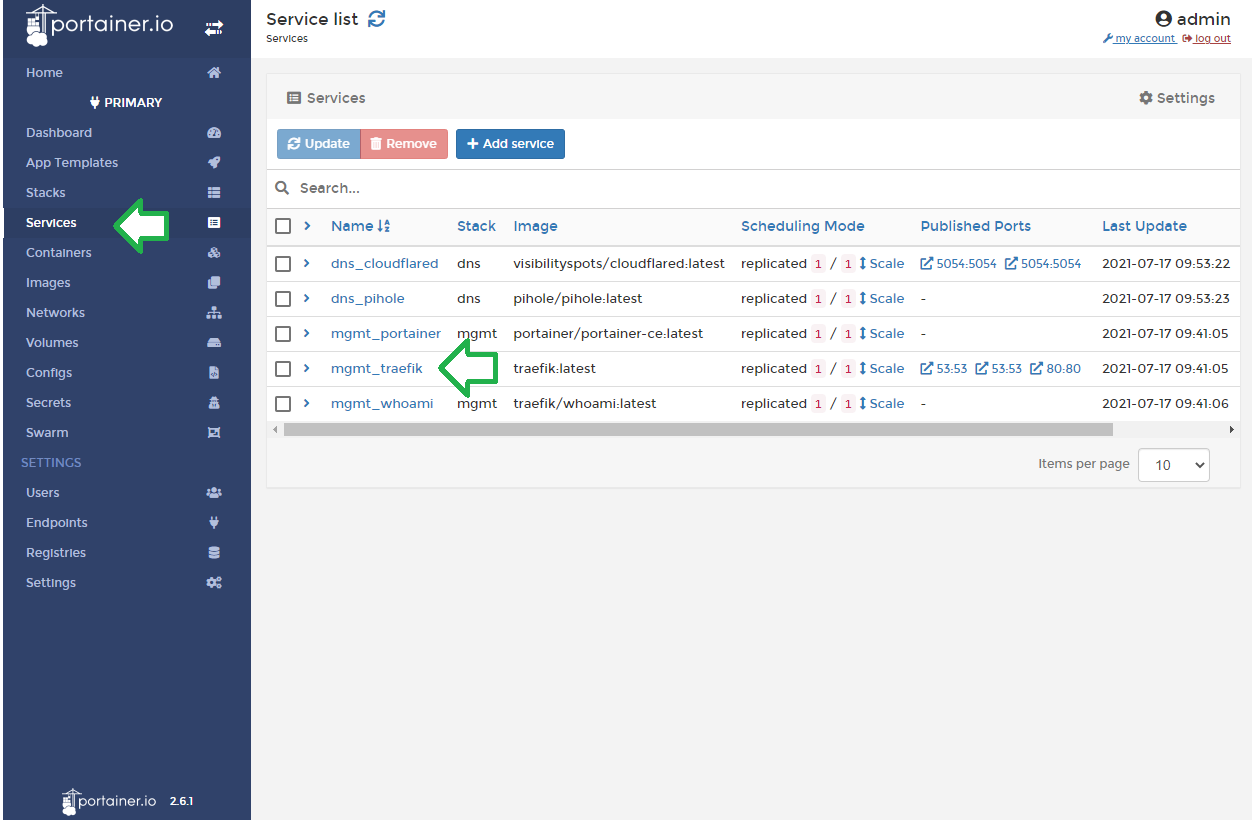
If you've noticed from the Service list view screenshot, I am only running 1 instance for all my services since it's a home network and I don't need the redundancy or load balancing at the moment (although I might scale Pi-hole and Cloudflared to 2 instances each as these containers have halted in the past). These services will be scaled to 2 or 3 before performing a service update in order to utilize the rolling update. Once all instances are updated, I will downscale them back to the initial scale.

Happy adblocking!
FAQ
Q: Where can get more blocklists?
Filterlists is a good place to start (https://filterlists.com/)
Q: What the hell are you on about?
For anyone starting from scratch, the initial steps not mentioned in this guide are:
- Installing Ubuntu server (https://ubuntu.com/download/server), for Raspberry Pi (https://ubuntu.com/download/raspberry-pi)
- Enable SSH after booting into Ubuntu:
sudo apt install openssh-server. This will allow remote terminal login to your server via ssh. e.g.ssh your-username@your-server-ip-addressfrom another computer with an SSH client. Windows 10 has SSH built-in or you can use PuTTY. - Installing Docker-CE: https://docs.docker.com/engine/install/ubuntu/
You do not need to install Ubuntu for the Rasberry Pi, there's also Raspian OS. Just make sure to do steps 2 and 3.
Q: How do I deal with the port 53 conflict error with the Traefik container?
There are two approaches to this. I will guide based on Ubuntu. You can use this as a guide for your system.
First, we need to find out what's using port 53 and determine if we can stop, or disable it. If you can't then read further for the alternative.
sudo netstat -pna | grep 53If you're on Ubuntu 18.04 (I believe) and newer, it will most likely be caused by systemd-resolved.
If it is then:
sudo systemctl stop systemd-resolvedto stop the servicesudo nano /etc/systemd/resolved.conf- Uncomment
#DNS=and replace it with our DNS of choice. It shouldn't matter as this is for your host. I chose cloudflare. It should then look like thisDNS=1.1.1.1 - Uncomment
#DNSStubListener=noor add the line if it's not there. - Save and exit the text editor.
sudo ln -sf /run/systemd/resolve/resolv.conf /etc/resolv.confcreates a symbolic link and replaces the current link in the existing path.- Check that DNS still works by doing a
ping github.com - If you see an error about
sudo: unable to resolve host ubuntu: Name or service not knownthen edit yourhostsfile and add127.0.0.1 your-machine-namebelow127.0.0.1 localhost.
If you cannot stop the service that's currently using port 53 then you can update the mgmt stack docker-compose.yaml to use docker's loopback.
traefik:
  image: traefik:latest
  ports:
    - target: 53
      published: 53
      protocol: tcp
      mode: host
    - target: 53
      published: 53
      protocol: udp
      mode: host
    - target: 80
      published: 80
      protocol: tcp
mode: hostUnfortunately, IP address format is not supported in long-form port declaration. It will need to change to:
traefik:
  image: traefik:latest
  ports:
    - 0.0.0.0:53:53/udp
    - 0.0.0.0:53:53/tcp
    - target: 80
      published: 80
      protocol: tcp
mode: hostA caveat of using this method is that Traefik won't be able to forward the real IP of the requestor in the request header for X-Forwarded-For and X-Real-Ip. That IP will be a docker NAT IP (test this out using http://whoami.test.local). It's not important for our purpose, but if you were to deploy another web service that utilizes this then it could be an issue.
Q: Pi-Hole client id in the query log only shows Traefik's hostname
When a request comes in through a reverse proxy via HTTP, the request's originating IP is passed along in the request headers as X-Forwarded-For and X-Real-Ip. However, with DNS, there's no such flag. There's been a proposal for DNS X-Proxied-For but that's not a standard. https://tools.ietf.org/id/draft-bellis-dnsop-xpf-03.html
Pi-hole only makes notes of which immediate client sent the request, and in this case, it's Traefik. If you really want to make this work then you can implement a macvlan network and attach your Pi-Hole instance(s). This would allow a Docker container to receive an IP on your router's subnet and allow direct communication.
If pi-hole was not in swarm mode then this would not be an issue (this was my previous setup). In swarm mode and behind a load balancer, you would need to allocate a block of IPs to dedicate to the swarm (IP assignment is not supported in swarm mode) while the load balancer would only apply to port 80 traffic to pi-hole's web UI.
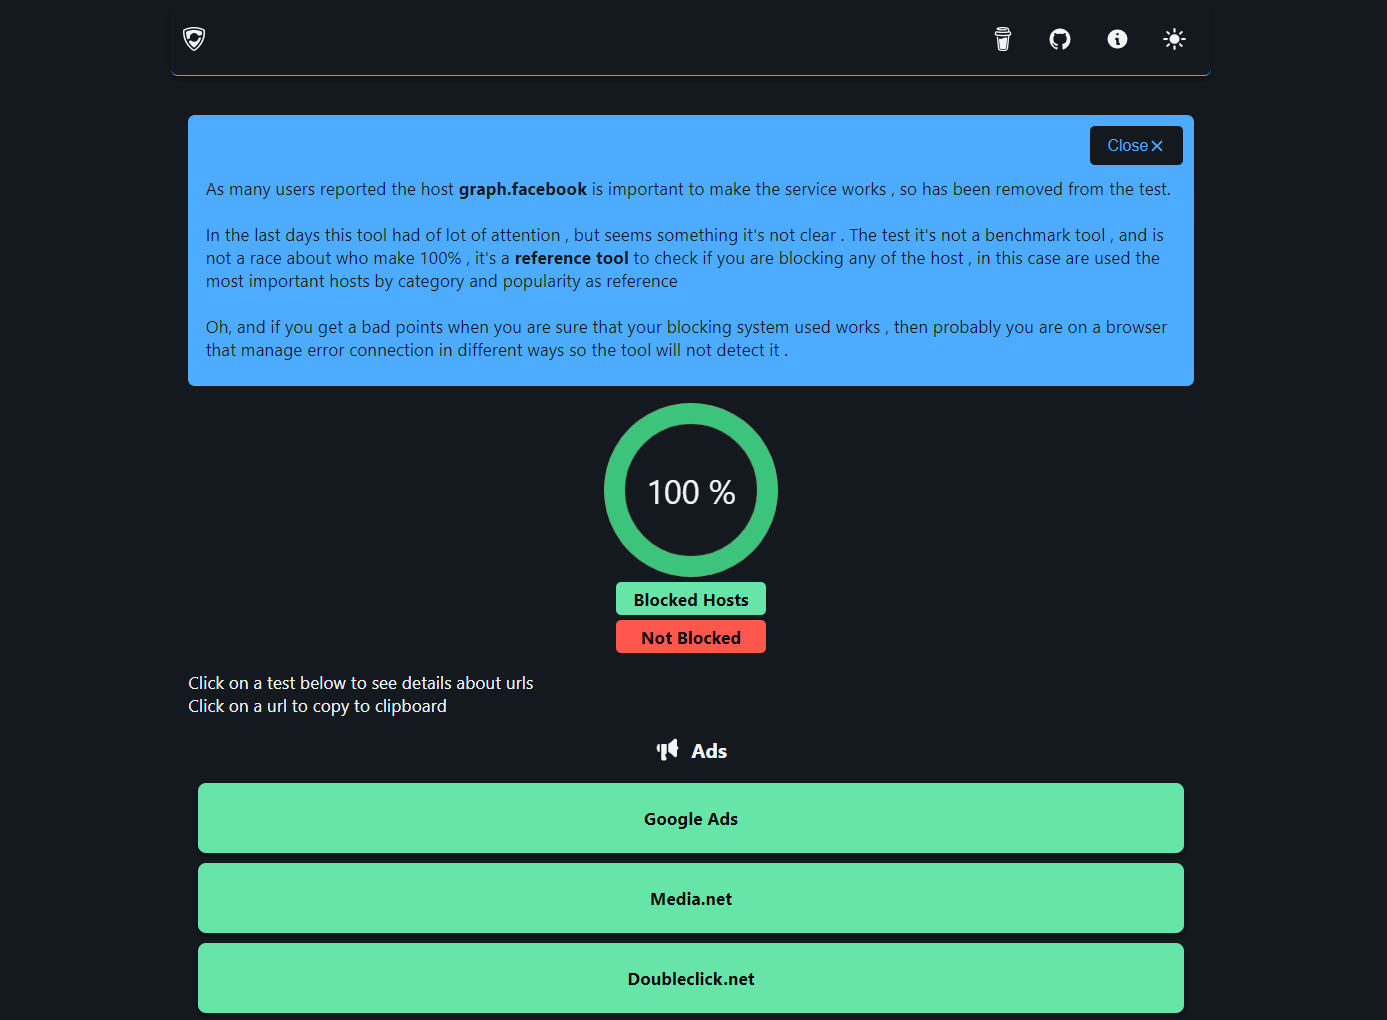
Q: How do I test my adblocking capability?
https://d3ward.github.io/toolz/src/adblock.html is a good place to start. It should show you whether you are blocking major players on the DNS level.
You could also turn off your browser ad block extension and go to a known site with embedded ads. https://tweaktown.com is a good place to test.


Without a browser Adblock extension, it doesn't look pretty but it saves on your bandwidth usage since ads do not load at all. Use this in combination with a browser-based adblocker to remove those HTML elements. Without Pi-Hole ads will be hidden with browser adblockers but they would still load.